|
Sponsor Corner: |
This section is devoted to absolute beginners, and it is meant as a concise primer on crochet stitches. Anyway, I suggest you to buy a good book (like "Crocheting in Plain English") going more in deep on crocheting basics. It will repay you with hours of fun!
|
Sponsor Corner: |
1. Starting a project
OK, I assume you have a hook and a skein of yarn suitable for that hook first!
Every crochet project start with a chain: put the yarn on hook in this way:
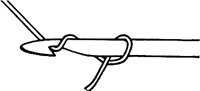
and let the hook slip through the loop you created, more and more; you will have a starting chain, composed of single chains:
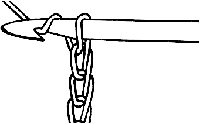
Confused? Look with attention at this other image, that shows another way to start:
You made the initial knot, and then slip through it to make first chain, and then slip through chain to make another chain. Easier to make than to write it!
![]()
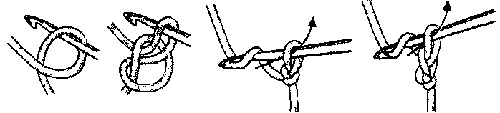
2. The Slip Stitch (sl st)
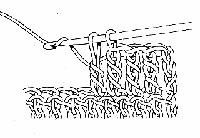
Now that you have the basic chain, you must use it as a base for stitches. Basic crochet stitches are a few, and the first one you must learn is the slip stitch. This stitch is rarely used for making patterns, but it is widely used to join crochet pieces worked in rounds, or to "walk" for reaching a given point in your work without having to cut the yarn and rejoin it.
*Insert the hook in a chain, put yarn over hook (we will abbreviate this operation with yo), draw a loop directly passing hook in the chain we inserted the hook in and in the chain on hook:*
Repeat this procedure on all the chains of your starting chain and you will have finished the row.
The arrow in the pictures denotes the direction of the hook to draw a loop. On subsequent rows, you will work the stitch on another stitches, i.e. you will have to insert the hook in the next stitch of previous row, and repeat the operations included between the asterisks (* and *) above:

Note than you must insert the hook under both the loops of superior part of the stitch in previous row. This is always true, apart when you want to do particular patterns.
![]()
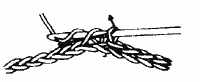
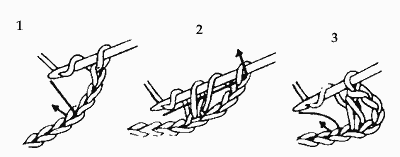
3. The Single Stitch (sc)
The first important stitch of crochet is the single stitch, widely used, particularly in yarn patterns.
*Insert the hook in a chain, yo, draw though a loop (1), yo, draw though the two loops that now you have on hook (2):*
Repeat this procedure on all the chains of your starting chain (3) and you will have finished the row.
The arrow in the pictures denotes the direction of the hook to draw a loop. On subsequent rows, you will work the stitch on another stitches, i.e. you will have to insert the hook in the next stitch of previous row, and repeat the operations included between the asterisks (* and *) above:
![]()
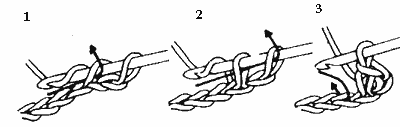
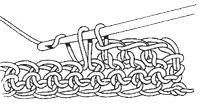
3. The Double Stitch (dc)
Probably the double stitch is the most widely used stitch in crochet. Pay attention because for a strange coincidence Britain patterns call this stitch triple and single stitch double.
*yo (1), Insert the hook in a chain, yo, draw though a loop (2), yo, draw though two loops, yo, draw through the 2 loops that now you have on hook (3):*
Repeat this procedure on all the chains of your starting chain () and you will have finished the row.
The arrow in the pictures denotes the direction of the hook to draw a loop. On subsequent rows, you will work the stitch on another stitches, i.e. you will have to insert the hook in the next stitch of previous row, and repeat the operations included between the asterisks (* and *) above:
![]()
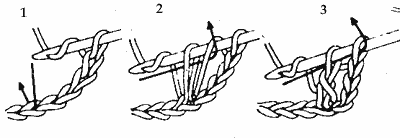
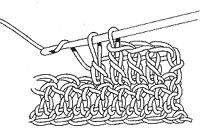
3. The Half Double Stitch (hdc)
The half double stitch is, like sits name suggests, a half way between single and double stitch.
*yo (1), Insert the hook in a chain, yo, draw though a loop (), yo, draw through the 3 loops that now you have on hook (2):*
Repeat this procedure on all the chains of your starting chain (3) and you will have finished the row.
The arrow in the pictures denotes the direction of the hook to draw a loop. On subsequent rows, you will work the stitch on another stitches, i.e. you will have to insert the hook in the next stitch of previous row, and repeat the operations included between the asterisks (* and *) above.
![]()
4. The Triple Stitch, or Treble (tr)
The treble is widely used in doilies and thread patterns. Like all other "superior", it is basically an extension of dc.
*yo twice (1), Insert the hook in a chain, yo, draw though a loop (2), yo, draw though two loops, yo, draw though two loops (3), yo, draw through the 2 loops that now you have on hook :*

Repeat this procedure on all the chains of your starting chain and you will have finished the row.
The arrow in the pictures denotes the direction of the hook to draw a loop. On subsequent rows, you will work the stitch on another stitches, i.e. you will have to insert the hook in the next stitch of previous row, and repeat the operations included between the asterisks (* and *) above:
![]()
5. The other stitches
Basically, all other stitches you will find on patterns are extension of dc, and they vary for the number of times you put the yarn over the stitches before inserting the hk. For example, the dtr (double treble stitch) is worked in this way:
*yo three times, insert the hook in a chain, yo, draw though a loop , yo, draw though two loops, yo, draw though two loops , yo, draw though two loops , yo, draw through the 2 loops that now you have on hook :*
and the triple treble (trtr)
*yo four times, insert the hook in a chain, yo, draw though a loop , (yo, draw though two loops) 4 times, yo, draw through the 2 loops that now you have on hook :*
![]()
| Return to Main Page | E-mail me! | Filet Primer | Patterns Page |
This page has been seen by
|
|
|
|
|
|
|
|
©Patrizia Pisani, 1998-2007
Last updated on